Preparing the canvas
The shoulder is arguably the most discussed and the most controversial element of a tailored jacket; the whole garment hangs from the shoulder, and the shoulder receives much of the strain from movement. There are perhaps as many ways of constructing, or “expressing” a shoulder as there are tailors, but there area few general shapes, or silhouettes. Some of the names have become muddled throughout the years, but I am going to chiefly examine one of them. Known as the “spalla insellata” because of its resemblance to a horse saddle, it is also known as a “spalla incavata” (concave shoulder) or pagoda shoulder, for obvious reasons. In the 30s the Apparel Arts referred to a natural shoulder as having a concave line, not the round one most often referred to today as a natural shoulder. To understand why, we look at the human shoulder (well, a plastic one. This is a family show, after all)
It is clear that the shoulder line between the trapezius and the acromion forms a concave curve; the front of the shoulder area is more complex due to the curvature of the clavicle and the protrusion of the top of the humerus, the ball which fits into the socket of the shoulder joint. It is this joint which is all important here, because this is where the whole arm moves.
Observing all these hills and valleys we can appreciate the complexity of the shape of the front of the shoulder and perhaps understand why the shape and location of the shoulder seam is crucial to this area. The closer the seam comes to all these curves, the easier it will be to accurately contour them. It was once fashionable to slant the shoulder seam backward which was a way of introducing some fullness over the shoulder blade, much like the vault dart or shoulder dart; the yoke of the shirt conceals one of these darts, and on heavier figures they are often included on the scye or the shoulder seam. In my posting on the one piece back, we saw how the gentle curve of the blade could be accounted for with a bit of stretching, shrinking, and a bit of wadding (shoulder pad) to fill in the hollow, rendering a backward slant unnecessary. It can also have some unfortunate results should the garment encounter humidity and the fullness puff up, unsupported by the shoulder. 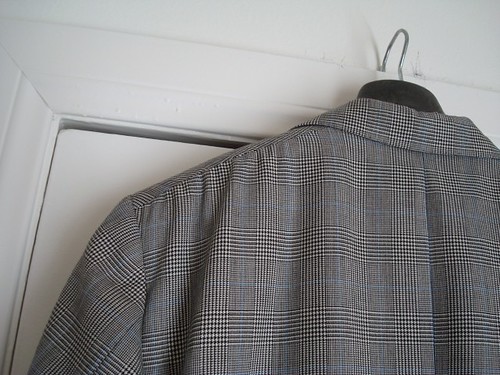
For these, and a few other reasons, the backward slant is generally only seen on garments from a few houses who like to maintain tradition and who may not have taken the time to fully examine its implications, feeling secure in the received wisdom without questioning it.
Going back to this complex formation, the astute pattern maker will recognize that, not only is the shoulder seam location important, but another seam or dart, or perhaps several, would be appropriate, even necessary. Throughout published literature, tailors have illustrated ways in which these additional shaping mechanisms could be introduced to the canvas, with three principle variations. These two seem the most logical;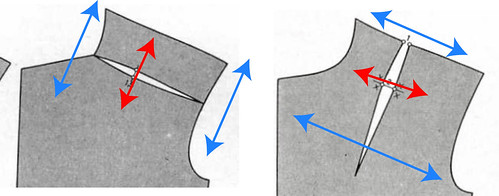
Darts like this will introduce shortness in some areas and length in others, shortness being indicated by the red arrow, and length being indicated by the blue arrows. The first example makes sense, but it introduces some length to the neck area, which, in my opinion, is asking for trouble as extra length may give trouble in the form of a collar lifting from the neck. It also introduces a great weakness in the canvas along that seam by cutting through the hair line. Any shaping of the outer canvas must be carried through all layers and it may be difficult to maintain this shape while providing support.
The second example is also valid, but introduces fullness to the chest, which is fine in a draped style but perhaps not so for cleaner cut chests. It also creates weakness in this area, though it would be easier to make up for this with haircloth.
Another look at the shoulder anatomy suggests that neither of these is the best location of the cuts or seams- the ideal location and slant are indicated by the red and green lines. 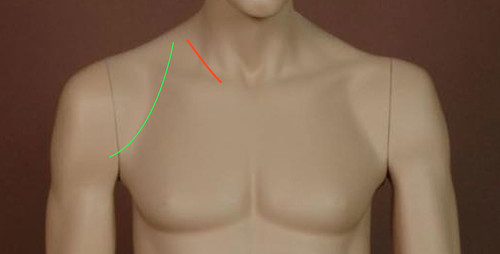
The third example is the one generally seen today, though the illustration is somewhat incomplete and inaccurate.
The cuts, or vees, should correspond with the hollow indicated by the red line in the photo of mannequin just above. These will throw fullness over the shoulder point and create the little hollow and bulge, but as we saw in the soft shouldered coat, this alone will not create the pagoda shape. Most modern coats have these vees to give some forward pitch without creating fullness at the neck or over the chest. To get the pagoda shape, a few more cuts and manipulations are required.
As we look at my way of constructing this shoulder, rather than a slavish adherence to any formulae I may suggest, try to understand the concept behind it so you can adjust to suit your taste or figure, or to work out a totally different shape of your own.
Start with a cut about 3” deep, 1/3” of the way across the shoulder, with an inclination similar to the little red line on the mannequin. Using a bias piece of canvas, open this cut 5/8” to ¾”. When I cut my bias strip, I make a step the width of the desired opening to act as a guide. This will stick out the top but I will trim it off after.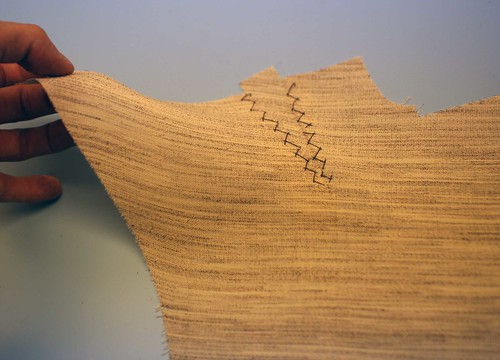
This will provide forward pitch but to get the complete shape, a little stretching will be required along the armsye. Normally I leave it off to the end of the canvas construction, but to give an idea of the final shape, I have done it first.
Observe the hairline of the canvas, how it bows upward. The combination of the cut and the stretching create the same effect as the two cuts illustrated in the first diagram, combined, creating length along the shoulder and the armscye, but keeping both the chest and the neck edge short.
To cut the haircloth piece, strike a line along the straight grain of your canvas about 10” long to measure the inclination of the roll line. Let’s say that the short arm of this angle is 3”. Draw a straight line down the center of the haircloth long enough to extend from the shoulder to the desired length of the chest piece (another subject entirely), use the measurement obtained from the canvas, 10” by 3”, to draw the angle of the roll line, and cut along this line. Place the hair cloth pieces together along the roll lines, line up the canvas roll line with the cut edge and draw in the rough shape of the shoulder seam and the first cut location as well as the scye shape, then rough cut the chest piece, which will later be trimmed to fit the canvas more accurately.
It is vital that all shaping remain constant through all layers, but if all the cuts occur in the same place, there will be structural weakness and thickness which is not good. Treating the cuts as darts, which can be transferred anywhere around their apex (a subject covered at great length in regular patternmaking courses so I won’t go too much into here) the cut of the haircloth should be pivoted slightly so as not to occur in the exact same place as the canvas cut. A cut is then also required is in the scye area as show, since the stretching we will do on the canvas is difficult to achieve properly in haircloth. We will open the cut of the haircloth in the same manner as the canvas, but leave the armscye cut open. For now.
Using the haircloth piece as a guide, we will cut what we call the perk, or shoulder support piece, also out of haircloth. This piece is very important to a clean shoulder and should not be cut on the straight grain but on the bias. Some makers prefer a perfect bias, I prefer a partial bias; this bias not only supports the hollow created in the shoulder shown by the diagonal green line above, but also makes stretching easier. To get my grain line, I measure an angle 3” long and then 1” toward the neck point, then join the points for my new grain line. Use the chest piece as a pattern, using this new grain line. The perk should stop about 1” below the cut on the chest piece, and should go straight across. In the image I have drawn in the hairline, not the grainline, so you can see how the perk will support the area.
Trim the perk so that it is about 3/8” inside the roll line and shoulder edges to avoid thick ridges. Halfway down the roll line portion of the perk, make a horizontal cut which will almost reach the shoulder cut of the chest piece. Instead of using a bias strip on this portion, we will use the chest piece as an anchor to open up the cut, but only 3/8” this time. Notice how all the cuts radiate around the same point? This is extremely important to get everything to gel together correctly when finished. Notice also how there is some weakness which creates a ripple of length along the roll line? This will be privoted toward the shoulder soon.
Now baste the chest piece on to the canvas, being sure to keep the roll line straight, which will force all the length created by the cuts over to the shoulder point. VERY IMPORTANT. 
A straight cut piece of canvas should be used to cover the front edge of the chest piece, where the hair often pokes through and bothers the wearer; this will also help to stabilize the roll line and keep the length over the shoulder. You may want to use a strip of pocketing to cover the lower edge of the chest piece to prevent poking through as well.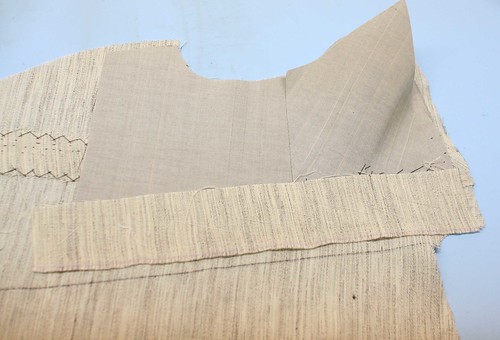
Despite the staggered cuts, the canvas should be coming together like this, with all the shaping being sent toward the shoulder point.
Place a piece of felt, flannel or domette as you like, and pad stitch the canvas the way you normally would (another subject) but leaving the shoulder free. Make sure to keep the area around the neck straight, and pad this area a little more heavily to stabilize that weakness in the perk we saw earlier. It is now that we should use the iron to stretch the armsye area; the canvas will stretch, the perk will stretch a bit but will also shift, and the scye cut in the chest piece will open up, but still be loose. Commercial canvas front makers like Interforme have big pressing machines which have shapes which support the chest while stretching the shoulder all in one shot. Once we have basted the canvas to the front and inserted the shoulder pad, we will then pad stitch through all those layers- the cut will be open but supported by the perk underneath which is longer for that reason and the shape will be fairly permanent and won’t “break down” with time. Ahem.
Now the canvas goes in water overnight (never never never skip this step, no matter what canvas makers say about being preshrunk) and while it is soaking and drying we can make the shoulder pad. The canvas will get a torough pressing when it dries out, and another little stretch in the scye. And now I wait for the flannel to arrive so I can cut the cloth. EDIT** CLOTH JUST CAME!*** But while we wait, go back to the posting on the canvas for the soft shoulder- one pice of canvas, one little cut. That's it. Compare the two, knowing we have only completed the first of several steps; some people contend that the soft shoulder is the greater art form. I beg to differ.
And meanwhile an amusing little article about Bill Fioravanti, who also favors the concave shoulder. I have never met him, but Chris Despos has only good words for him, and if I am not mistaken, called him one of the best fitters he knows. High praise indeed!
In response to Dukemati's question, my canvas and haircloth are both from Rovagnati Vincenzo spa; the canvas is the lana 180g (sometimes I use 200g) and the chest piece is made from 21 pick haircloth- nice, light and resilient. If you are in North America, their distributor is Interforme Interlinings, esturino at interforme dot com; Emilio Rovagnati will be here next week, I will ask him about worldwide distributors.


6 comments:
jeffrey
this is amazing. i was just browsing at c&t and saw your blog link. i am just about to begin my first canvas coat and i have long admired the pagoda shoulder but never thought i could make up a coat with such a feature. thanks a great deal. will you be blogging re padstitching the canvas? i look forward to your future installments. your blog is top notch, btw.
Jeffrey
many thanks for this amazing step-by-step tutorial. May I ask you to specify what kind of canvas and chestpiece you use (weight and brand)?
Jeffrey
thx a lot for the fast response.
Jeffrey, this is helpful and inspirational. Thank you for posting such wonderful pictures and insight.
Jeffrey,
Many thanks for this great tutorial. I have always cut my canvas with a ()shaped dart on the shoulder, but it result in a chest not clean enough, and since I've learnt on my own, with few literature, I didn't know how to manage it. I always loved the appearance of the pagoda shoulder, but I didn't even know it's name.
I've followed all the steps, but have some questions: first, wich cut(s) to place in the dommette, or maybe it needs stretching to follow the shape of the canvas-haircloth?
I soake the canvas and haircloth before cutting them, is it Ok? Maybe is it better to do it your way?
And also, do I need to change the cut of the front pannel of the jacket to do a pagoda shoulder? Or maybe just stretching the armscye/shoulder area?
I hope not to bother you with so many questions!
Thanks a lot for sharing your knowledge with us, this is very, very helpful.
The Vee Cut at the shoulder would create length on canvas, wouldnt it? Thus, should we trim off the extra length (after stretching) to match with the outer cloth?
Post a Comment